%20{%20.v%20{%20fill:%20%23edeef0;%20}%20.cursor%20{%20fill:%20%23ff4d5e;%20}%20}%20%3c/style%3e%3cpath%20class='v'%20d='M4%2014h10.5L22%2039.5%2029.5%2014H40L28%2050H16Z'/%3e%3cpath%20class='v'%20d='M42%2014h33v9H63v27H54V23H42Z'/%3e%3crect%20class='cursor'%20x='78'%20y='45'%20width='18'%20height='5'/%3e%3c/svg%3e)
StartYour first agent
Your first agent
Start an agent from the chooser, watch its state change, and answer its question without hunting for its pane.
This tutorial starts one agent, shows you what Vendetta knows about it, and answers what it asks. It takes one terminal with tmux and one providerProvider. The program an agent runs: Claude Code, Codex, omp, OpenCode, Gemini CLI, or Aider. that is installed and logged in. The examples use Claude Code.
You need Vendetta installed first.
Start the worker
Section titled “Start the worker”The workerWorker. The background process everything talks to, one per user. Start it with vendetta notify start.Worker. The background process everything talks to, one per user. Start it with vendetta notify start. is the background process the chooser, the apps, and every plugin talk to.
vendetta notify start
vendetta notify statusA second start does no harm. To have it start at login, see
Run at login.
Bind the keys
Section titled “Bind the keys”Vendetta binds no tmux key until you name it. Add the two this tutorial uses:
[plugins.host-tmux.keys]
chooser = "alt+s"
overview = "alt+w"The worker binds them in your tmux server within a moment; tmux.conf needs nothing.
Open the chooser
Section titled “Open the chooser”Start tmux in a project folder and press Alts:
cd ~/projects/atlas-api
tmux new -s atlas-apiThe chooserChooser. The screen in your terminal that lists projects and agents and jumps to any of them: vendetta tui, or Alt+s in tmux once you bind it.Chooser. The screen in your terminal that lists projects and agents and jumps to any of them: vendetta tui, or Alt+s in tmux once you bind it. opens as a popup. Your projects are on the left, with the one you
came from selected. vendetta tui opens the same screen in any terminal.
Start an agent
Section titled “Start an agent”Press n. The form is filled in with your provider, this project, and its folder; change the model or effort if you like. Press Enter to review, and at Launch this agent? press Enter again.
The agent starts in the project’s Agents tabAgents tab. The pinned tmux window in each project where managed agents run.Agents tab. The pinned tmux window in each project where managed agents run., a tmux window Vendetta keeps for
the agents it starts, and the chooser selects it. Its row shows a pause icon (○):
ready for its first prompt.
Give it something to ask about
Section titled “Give it something to ask about”Press Enter on the agent to go to its pane, and type a prompt that makes it stop for you:
Before you write anything, ask me whether the notes file should be Markdown or plain text.Now leave it. Switch to another tmux window, or stay and watch.
See its state
Section titled “See its state”Press Alts from anywhere in tmux. The agent’s row and its project’s counts follow what it is doing:
| Icon | Meaning |
|---|---|
▶ |
Working |
? |
Waiting for you: a question, or its next prompt |
! |
Asking permission for a tool call |
○ |
Ready |
◇ |
Found, but its state is unknown |
× |
Exited, ready to restore |
With a Nerd Font installed these show as icons. The preview on the right mirrors the agent’s terminal live. q closes the chooser.
Answer it
Section titled “Answer it”Press Altw for the overviewOverview. The dashboard of four lanes: Needs you, Working, Ready, and Ended today.Overview. The dashboard of four lanes: Needs you, Working, Ready, and Ended today.. Agents sit in four lanes: Needs you, Working, Ready, and Ended today. Yours is in Needs you, with its question and the options on its card.
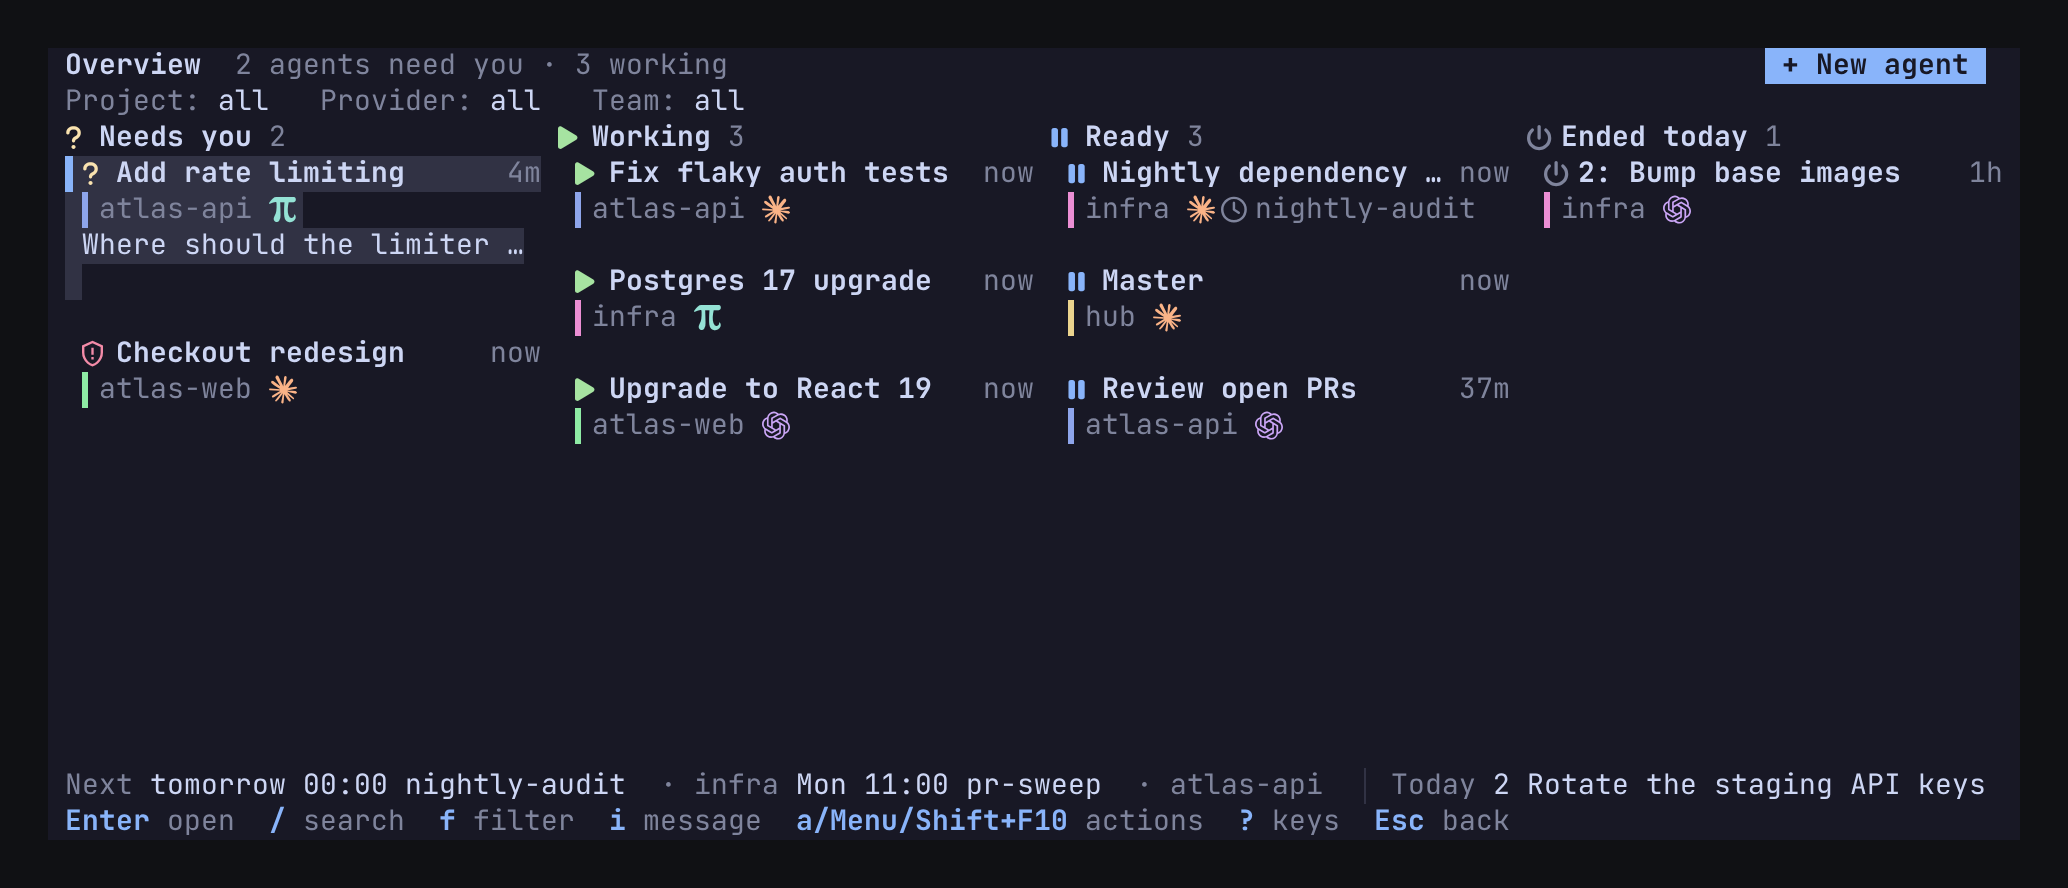
Press the option’s number, 1 or 2. The answer goes to that exact agent, and its card moves to Working.
An agent you start this way asks before it runs a command. That request is an approvalApproval. A provider's permission dialog for a tool call. Only you answer one: at the terminal, or for Claude Code in the iPhone and web apps with Allow once or Deny.Approval. A provider's permission dialog for a tool call. Only you answer one: at the terminal, or for Claude Code in the iPhone and web apps with Allow once or Deny., and you answer it on the same card: 1 approves and 2 denies.
A question with several parts opens in the agent’s pane instead; Enter on the card takes you there.
Send it a message
Section titled “Send it a message”On the agent’s card in the overview, press i, type a follow-up, and send it. A message reaches a working agent as a normal prompt; it never interrupts the turn.
Stop it and bring it back
Section titled “Stop it and bring it back”In the chooser, select the agent, press S, and confirm Stop this agent?. Its conversation stays in the history as an exited row. Select that row and press Enter: the same conversation comes back in a new pane.
Next: Connect your phone or browser, to answer the same card away from the terminal.